Showing posts with label Chocolate. Show all posts

Tuesday, July 14, 2015

Dark Chocolate Coconut Truffles with Coconut Caramel Drizzle

When I was younger, I used to be able to eat an entire box of candy in one sitting. Not a small box. Like... the big fancy boxes stuffed with a variety of chocolaty goodness. The ones that most people savor over the course of a week... or share with someone special. Not me. Luckily I was pretty active back then and it didn't catch up to me... too much.

A lot has changed since then, and I am super thankful for most of it. Occasionally I miss the richness of fancy truffles or caramels, which then just inspires me to whip up a batch of my own. Thank goodness I have gained some willpower since my childhood, and can no longer down that much sugar in one sitting-- otherwise baking all of the time would bring about a whole new problem for me.

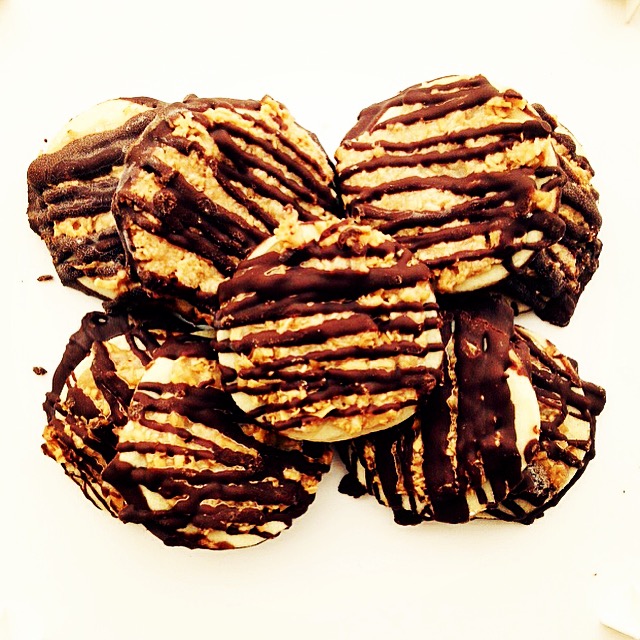
These truffles have a super rich and silky filling and are coated in a crunchy layer of chocolate. I topped this batch with a coconut caramel drizzle because I had some extra time on my hands. Feel free to leave the caramel off, or change the coconut extract to a different flavor-- you can even just roll the filling in some powdered sugar or cocoa powder if that's what you prefer!


Center Ingredients:
  • 15 ounce can coconut creme (I use trader joe's thick and rich coconut creme)
  • 22 ounces vegan dark chocolate (either chocolate chips or a bar is fine-- but if using a bar cut into small pieces)
  • 1 tablespoon coconut extract
  • 1 teaspoon vanilla extract
  • 1/2 cup vegan butter, cut into small cubes
Coating Ingredients:
  • 3 cups vegan chocolate chips (or any vegan chocolate as long as it is cut into small pieces.)
  • 1 tablespoon vegan shortening
  • 1 teaspoon sea salt
Caramel drizzle(optional):
Preparation:
  1. In a large heat safe bowl, pour in the dark chocolate.
  2. In a small sauce pan, heat the coconut milk until it begins to bubble, but remove from heat before it reaches a roiling boil.
  3. Pour heated coconut milk over chocolate, and let sit for 2 minutes.
  4. After the 2 minutes is up, stir the coconut and chocolate until the mixture is smooth, and thoroughly combined.
  5. Add the butter and extracts to the chocolate mixture. Stir until all butter is melted and fully incorporated. Cover bowl with foil. 
  6. Refrigerate mixture for a minimum of 6 hours, preferably overnight, so that it can set.
  7. After the refrigeration time is up scoop the mixture into balls. (You can use a regular spoon if that is all you have-- your truffle balls just may not end up perfectly round... then again mine never end up perfectly round anyway! I promise they'll still taste the same though) 
  8. Place truffle balls on parchment lined baking sheet(s)
  9. Freeze for at least 20 minutes.
  10. In a double boiler- heat the chocolate and sea salt until chocolate is melted.
  11. Remove balls from freezer and dip into melted chocolate. (If this process ends up taking a while-- you may want to refreeze the balls or remelt the chocolate. Use your discretion.)
  12. Freeze for 5 minutes before applying caramel drizzle.
  13. Melt caramel candy in a double boiler until smooth.
  14. Drizzle caramel over truffles.
  15. Refrigerate the truffles until the caramel drizzle and chocolate coating sets. 
  16. Store in an airtight container in the refrigerator until you want to serve/eat them!
  17. Let sit at room temperature for 5 minutes before eating. (Sometimes the caramel gets a tad hard in the cold, so it is better to let it get soft again.)


Enjoy!!

Monday, July 13, 2015

Chocolate Chunk Cookies with Cinnamon

One thing I could never get sick of is chocolate. In fact, I find any excuse possible to use it/eat it whenever I can. When I first met my husband, he insisted that he hated chocolate and refused to eat it... or so he claimed. I couldn't believe it! Well... I believed him... that was until I caught him sneaking some chocolates I made out of the fridge one day. Now I don't feel so bad for putting chocolate into most of my baked goods.

These cookies are packed with gooey chocolaty perfection, and a hint of cinnamon make them a little different than a typical chocolate chip cookie. Feel free to leave out the cinnamon if you're not a huge fan, or heck-- throw in a little extra if you want! I find the best ways to use other people's recipes is to spice it up a little to your own liking.


Ingredients:
  • 3/4 cup vegan butter, softened
  • 1 cup brown sugar, packed
  • 1/4 cup raw sugar
  • 1/2 cup applesauce
  • 2 teaspoons vanilla extract
  • 3 cups flour
  • 2 teaspoons cinnamon
  • 1 1/2 teaspoons baking soda
  • 1 teaspoon sea salt
  • 1 cup chocolate chips
  • 2 cups dark chocolate, chopped into chunks
Preparation:
  1. Preheat oven to 350 degrees and line 2 baking sheets with parchment paper
  2. In a stand mixer, add softened butter and whip on high speed for 2 minutes. Turn off mixer.
  3. Scrape the sides of the bowl with a rubber spatula, add both sugars, and turn mixer onto medium speed. 
  4. Once sugars are fully incorporated, return mixer to high speed and beat for another 2 minutes. Turn off mixer and scrape down the side with rubber spatula.
  5. Turn mixer to low speed and add in the applesauce and vanilla extract.
  6. In a separate bowl, mix together the flour, cinnamon, baking soda, and sea salt.
  7. While mixer is still on low speed, add the flour mixture to the wet mixture 1/4 cup at a time until all of the mixture has been added. 
  8. Add in all of the chocolate and mix until chocolate is evenly distributed into dough.
  9. Scoop about 1/4 cup of mixture, roll into a ball, press slightly flat, and put onto prepared baking sheet.
  10. Repeat until you have a full sheets, with dough spaced apart to allow for slight spreading.
  11. Bake cookies, 1 tray at a time, for 9-12 minutes.
  12. Allow to cool for 5 minutes before removing from tray. 
  13. Repeat process until all cookies are baked.
Enjoy!!

Monday, July 6, 2015

Peppermint Patties

Candy is one of my favorite things to make-- mostly because I love to eat it afterwards. I saw a shirt once that said "I run because I love dessert" and I really wish I had gotten it... or several of them, so I could wear them everyday. I feel like people would understand me better if they knew that information upfront. That way they understand why I don't run because I have a love of running. Not that I am some big time runner-- because... well I am not. But I swear if I wasn't such of fan of chocolate and other treats my treadmill and running shoes would collect a lot more dust. 

Peppermint patties are a simple treat to make, and are very refreshing to eat. And let's not forget delicious... because they are exactly that. DELICIOUS. That's probably why I tripled this recipe when I made it... 

I added a bit of green food coloring just to make them a little more interesting, but feel free to leave it out if you don't feel like eating Incredible Hulk peppermint patties.


Ingredients:
  • 3 tablespoons earth balance buttery sticks, softened
  • 2 teaspoons mint extract
  • 2 tablespoons soy milk
  • 2 1/2 cups vegan powdered sugar
  • 1 teaspoon green food coloring (more, or less, or none!)
  • 2 1/2 cups vegan chocolate
  • 1 tablespoon vegan shortening
Preparation:
  1. In a stand mixer, add the softened earth balance, mint extract, soy milk, food coloring, and powdered sugar.
  2. Start mixing on a low speed until a crumbly mixture starts to form.
  3. Once it is mostly combined, turn the mixer on a high speed and beat until creamy. (If your mixture is too dry feel free to add a little extra soy milk, or if it is too sticky, add a little more sugar. You want to end up with a pie dough-like mixture.)
  4. Roll mixture into a log in the diameter you like, wrap in plastic wrap, and freeze for 1 hour.
  5. Remove from the freezer, take candy out of the plastic wrap, and cut into disks of the thickness you like.
  6. Lay the disks flat on a parchment paper lined baking sheet.
  7. Once all of the candy is cut, return to the freezer for another hour. 
  8. At the end of the hour, melt the chocolate and shortening in a double boiler- mixing so it combines well.
  9. Remove candy from freezer, and take the chocolate mixture off of the heat.
  10. Lay the candy flat on a fork, submerge into the chocolate, raise fork and let excess chocolate drip off. (You can use a second fork to scrape the underside of the first fork to remove the excess chocolate more quickly.)
  11. Lay the coated candy back onto the parchment sheet. (I flip the fork and let the candy fall off so I don't touch it with my finger. That way more chocolate stays on the candy.)
  12. Repeat until all of the candy has been coated in chocolate.
  13. If you have extra chocolate, feel free to drizzle the remainder over the coated candy.
  14. Return to freezer for another 30 minutes so the chocolate can harden completely before packaging or eating!

Enjoy!!

Tuesday, June 30, 2015

Rocky Road Brownies

Brownies are one of my favorite desserts. I especially like the dense fudgey kind, because... well who doesn't?! I have also grown to love adding a crunchy element to my brownies on occasion. (When I was younger I hated crunchy things in my desserts... especially nuts of any kind. Not in my ice cream, cookies, and definitely not brownies.)

These fudgey brownies are loaded with many elements of awesome. I used walnuts this time, because that's what I had on hand-- but feel free to try whatever nuts you like best! 


Ingredients:
  • 1 cup vegan butter
  • 1 1/2 cup sugar
  • 1/2 cup agave nectar
  • 1 1/4 cup cocoa powder
  • 3/4 cup applesauce
  • 2 teaspoons vanilla extract
  • 1 1/2 cups flour
  • 1 1/2 teaspoons baking powder
  • 1 teaspoon sea salt
  • 2 1/2 cups chocolate chips
  • 1 1/2 cups walnuts
  • 2 cups vegan ricemallow creme 
Preparation:

  1. Preheat the oven to 350 degrees
  2. Grease a 9x13 inch pan (I usually line my pan with foil too)
  3. In a small saucepan, melt the butter on medium heat.
  4. Once the butter is melted, whisk in the sugar and agave nectar- stirring until well mixed.
  5. Remove pan from heat and add the cocoa powder. Whisk until all of the ingredients are well incorporated.
  6. In a stand mixer, add cocoa mixture, applesauce, and vanilla extract. Mix on low speed.
  7. In a separate bowl, mix together the flour, baking powder, and sea salt.
  8. While mixer is still on low speed add in the dry mixture 1/4 cup at a time until it has all been used.
  9. Remove the mixing bowl from the stand. 
  10. Using a rubber spatula fold in the chocolate chips and walnuts.
  11. Bake for 25 minutes.
  12. Carefully remove the brownies from the oven.
  13. Spoon blobs of ricemallow creme over the entire top of the brownies (You're going to be able to spread the creme better once it melts)
  14. Bake the brownies for another 7 minutes, until the ricemallow creme begins to brown.
  15. Remove the brownies from the oven, and carefully spread around the ricemallow creme until it more evenly covers the top.
  16. Let cool completely before cutting.
Enjoy!


Sunday, June 28, 2015

Vegan Samoa Cookies


I love being vegan for many reasons-- but sometimes I get a craving for something I ate before I became vegan. Where I live there is quite an abundance of vegan options at various places, so I am pretty fortunate. The unfortunate part is that I crave things I can't buy anywhere... that I know of. Which I guess isn't that unfortunate for me, because it gives me an excuse to try to recreate what I am craving.

And lately... girl scout samoa cookies are ruling my brain. I tried to suppress the longing for the coconutty chocolaty caramel treat that they are, but I couldn't take it anymore... so I made my own version.  


Vegan somoa cookies. Eat that, girl scouts! No, really... I would totally share them with you.


Cookie Ingredients:
  • 1 cup vegan butter, softened (I used earth balance buttery sticks)
  • 1/2 cup sugar
  • 1 teaspoon vanilla extract
  • 3 tablespoons soy milk
  • 2 1/4 cups flour
  • 1/4 teaspoon sea salt
  • 1/2 teaspoon baking powder
Coconut Topping Ingredients:
Chocolate Sea Salt Ingredients:
  • 12 ounces vegan dark chocolate 
  • 1 teaspoon sea salt
Preparing the Cookies:
  1. In a stand mixer, blend together the softened butter and sugar on a low speed. Once fully mixed, beat on a high speed for 2 minutes.
  2. Return the mixer to low speed, and add in the vanilla extract and soymilk. Mix until all of the ingredients are fully incorporated.
  3. In a separate bowl, mix together the flour, baking powder, and sea salt.
  4. While mixer is still on low speed, add the dry ingredients 1/4 cup at a time until the mixture has all been added.
  5. Once you've finished mixing, remove the dough from the mixer, press into a flattened disk, wrap in saran wrap, and refrigerate for about an hour. (Be careful not to over-chill because the dough will become crumbly, and difficult to work with.)
  6. Once you're done chilling, remove the dough from the refrigerator.
  7. Preheat oven to 350 degrees
  8. On a lightly floured surface, roll the dough out about 1/4 inch thick, and cut into small circles. (I didn't have a cookie cutter, so I just used a glass) 
  9. Place cut dough onto a sheet of parchment paper, so it doesn't stick. 
  10. Repeat the process until you have used all of the dough.
  11. Place cookies on a baking sheet lined with parchment paper. Bake for 8-10 minutes, being careful not to overbake. (the cookies will remain pale in color even when they're done!) Continue until all cookies have been baked.
  12. Let cool completely before assembly.
Preparing the Coconut Topping:
  1. On a lined baking sheet, spread the shredded coconut in a thin layer. Toast inn the 350 degree oven for 7-9 minutes until golden brown. (Stir occasionally so it toasts evenly. Once it becomes golden, remove immediately so it does not burn) 
  2. In a double boiler, melt together the caramel candy and coconut milk.
  3. Once completely melted, put 2/3 of the mixture in a separate bowl and mix in the toasted coconut. (Use a bowl that is safe to go back onto the double boiler.)
Assembly:
  1. Use remaining caramel mixture to spread a thin layer on the top of each cookie.
  2. Press the coconut mixture into the caramel layer, and let cool completely. (If the mixture becomes difficult to work with, you can reheat it on the double boiler.)
  3. Once cookies have cooled, melt the chocolate and sea salt together in a double boiler.
  4. Dip bottoms of cookies in the chocolate, and place onto parchment sheet.
  5. Use remaining chocolate mixture to drizzle over the tops of the cookies.
  6. Let chocolate set, and re-harden.
Enjoy!

Tuesday, June 23, 2015

Peanut Butter and Coconut Caramel Filled Vanilla Cupcakes With a Whipped Chocolate Frosting

I have a new obsession with stuffing things into cupcakes. If you can't get enough deliciousness into the cupcake and frosting... just fill it with more! Plus it's like a little surprise that no one but you knows about! Cupcakes have become even more exciting for me than I would have ever dreamed. 

These moist, extremely vanilla-y vanilla cupcakes are stuffed with a mixture of peanut butter and homemade coconut caramel sauce and topped with a fluffy chocolate frosting.


Cupcake Ingredients:
  • 2 cups flour
  • 1 cup raw sugar
  • 1/2 teaspoon sea salt
  • 1 1/2 teaspoons baking powder
  • 1 teaspoon baking soda
  • 1 cup soy milk
  • 1/2 cup vegan butter, melted
  • 1 tablespoon white vinegar 
  • 3 tablespoons vanilla extract
Filling Ingredients:
  • 3/4 cup peanut butter
  • 1/2 cup vegan caramel syrup (I used my coconut caramel recipe and changed the coconut cream from 2 1/4 cups to 3 cups)
Frosting Ingredients:
  • 1/2 cup vegan shortening 
  • 1 cup cocoa powder
  • 1 teaspoon vanilla extract
  • 4 cups powdered sugar
  • 1/4 cup soy milk (more or less depending on desired consistency)
Cupcake Preparation:
  1. Preheat oven to 350 degrees
  2. Line or grease 12 cupcake tins
  3. In a stand mixer, put all of the dry cupcake ingredients into mixing bowl. Allow to mix on the slowest speed while preparing wet ingredients
  4. In a separate bowl, combine all of the wet ingredients.
  5. While still on the slowest speed, add wet ingredient mixture into dry ingredients. Mix until fully combined while being careful not to overmix.
  6. Split batter between the prepared 12 cupcake tins.
  7. Bake for 18-20 minutes until top of cupcakes spring back when lightly touched.
  8. Allow cupcakes to cool completely before filling.
Filling Preparation:
  1. In stand mixer, put peanut butter and caramel sauce into mixing bowl.
  2. mix on lowest speed until completely combined.
  3. Turn mixer on high speed for 3 minutes.
  4. Put into refrigerator until needed.
Frosting Preparation:

  1. In stand mixer, beat shortening for 3 minutes on a medium speed to smooth it out. Turn to lowest speed.
  2. While still beating, add the vanilla extract.
  3. While still on lowest speed, add cocoa powder.
  4. Add about an 1/8 cup of the soymilk.
  5. Slowly add powdered sugar. (Make sure you don't add it too fast, or you're going to make a mess!)
  6. Add remaining soymilk, 1 tablespoon at a time, until you've reached your desired consistency. (Feel free to add more or less!) When you've finished adding the soymilk, turn the mixer to a high speed and beat for 5 minutes to fluff the frosting.
Assembly:
  1. Core cupcakes after they have cooled completely. Save the centers!
  2. Use a small spoon to fill cupcakes. (Put a small amount of filling on the spoon, using your finger or another spoon, stuff the filling into the cupcake.
  3. Put centers back into cupcakes to keep the filling in.
  4. Frost the cupcakes using a piping bag or knife!
Enjoy!!


Thursday, June 18, 2015

Sweet and Salty S'mores Bars.

I am in love with s'mores. It might sound like an exaggeration... but I assure you, it is not. If you could meet my husband and ask him how often I make s'mores, he would probably roll his eyes. Mostly because I always try to make him eat one, too. (To feel less guilty obviously) He, however, is not as much of a s'mores fan as I am. I probably should have considered that crucial fact before saying yes to marriage...

Okay, so s'mores bars. Delicious. They are soft, gooey, chocolaty, with a hint of sea salt. I wish you the best of luck trying not to eat the whole batch.


Ingredients:
  • 1 1/4 cups softened vegan butter
  • 1 1/4 cups raw sugar
  • 1 tablespoon vanilla extract
  • 2/3 cup applesauce 
  • 3 cups graham cracker crumbs
  • 1 1/2 cups flour
  • 1 teaspoon sea salt
  • 1 tablespoons baking powder
  • 2 teaspoons cinnamon
  • 4 cups vegan chocolate chips
  • 10 ounces vegan marshmallow fluff
  • 12 vegan marshmallow (each cut into 4 pieces. I used kitchen shears since they were super sticky and hard to cut with a knife.)
Preparation:
  1. Preheat oven to 350 degrees
  2. Line 9x13 inch pan with parchment paper; butter the parchment.
  3. In stand mixer, add butter and sugar.
  4. Mix on low speed until the sugar is fully dissolved into the butter. 
  5. Turn mixer on high speed and beat mixture for 3 minutes. Turn mixer back on low speed. Add vanilla and applesauce. Once incorporated, turn mixer off.
  6. In a medium bow, whisk together graham cracker crumbs, flour, salt, baking powder, and cinnamon.
  7. Turn stand mixer back onto low speed. Add dry mixture to wet mixture 1/4 cup at a time until it is all added. Turn mixer off.
  8. Spread 1/2 of the mixture on the bottom of your prepared pan. 
  9. Sprinkle 1 cup chocolate chips onto batter.
  10. Spread marshmallow fluff onto the top. 
  11. Sprinkle 2 cups of chocolate chips onto the top of the fluff.
  12. Place marshmallow pieces on top of the chocolate chips as evenly as possible.
  13. Put blobs of remaining batter on top. Place parchment paper over batter and flatten the blobs out by pushing lightly down and rubbing flat. Slowly pull parchment off. 
  14. Sprinkle remaining chocolate chips on top.
  15. Bake for 25-28 minutes until top starts to brown.
  16. If you want a little extra salty to your sweet, sprinkle another 1/2 teaspoon of sea salt on the top.
  17. Remove from oven and let cool completely before cutting.
Enjoy!

Monday, June 15, 2015

Coconut Peanut Butter Cookies with Chocolate Chips

Coconut. Peanut butter. Chocolate. Could you possibly ask for more?! (Well, if you said yes, you might need to find something else to bake!) These cookies are overloaded with chocolate and I find that the coconut oil brings out the taste of the peanut butter. These are more of a 'melt in your mouth' cookie than a classic chewy chocolate chip cookie, but I love variety! 

Vegan baking doesn't have to be boring and tasteless-- I swear!!


Cookie Ingredients:

  • 1 cup creamy peanut butter
  • 1/2 cup melted coconut oil
  • 1/3 cup vegan shortening
  • 1 cup firmly packed brown sugar
  • 1 tablespoon vanilla extract
  • 1/4 cup applesauce
  • 2 1/2 cups flour (I like to have a firmer dough, so sometimes I add a little more depending)
  • 1 teaspoon baking soda
  • 3/4 teaspoon sea salt
  • 3 cups vegan chocolate chips

Preparing the Cookies:
  1. Preheat the oven to 350 degrees
  2. Line a baking sheet with parchment paper or foil. You won't have to grease them. (I use two so I can let the first pan cool while the second bakes)
  3. In a stand mixer, add peanut butter, coconut oil and shortening. Mix on low speed until combined. Turn mixer off.
  4. Add brown sugar and mix on medium speed for 3 minutes.
  5. Turn mixer to low speed. Add vanilla, applesauce and mix until all of the ingredients until all are fully incorporated. 
  6. In a separate bowl mix flour, baking soda, and salt. 
  7. While mixer is still on low speed, add flour mixture 1/4 cup at a time until all of it is added. (This will help it mix in more evenly, and make less of a mess!)
  8. Mix in chocolate chips. (I usually do this with a wooden spoon because I feel like it more evenly spreads the chocolate chips. It might be all in my head, so feel free to use the stand mixer on a low speed.)
  9. Take about 1/4 cups dough (more or less, depending how large you want your cookies) and form a ball, press it slightly to flatten dough, and put on baking sheet. Keep dough about 3 inches apart.  Repeat until baking sheet is full.
  10.  Bake each sheet for 11-13 minutes. (if you have adjusted the size of your dough balls, remember to adjust the bake time!)
  11. Remove from oven and let cool for at least 5 minutes before removing from the baking sheet.
  12. Repeat until all of the dough is baked!
Enjoy!!

                  Wednesday, June 10, 2015

                  Chocolate Fudge Brownies with Chocolate Coconut Ganache

                  If you're having a serious chocolate craving, this recipe is for you! Or if you're like me, and wish you had 'the chocolate touch', these are also for you. (Did anyone else read that book growing up? I. loved. it. It's probably still my favorite book of all time. I am pretty sure that would be my version of Fifty Shades of Grey. Everything that touches to my lips turning into chocolate?!... count me in!! I would love to have a room in my house dedicated to my love for chocolate.)

                  Anyway... these brownies have a very rich chocolate flavor and subtle hint of coconut from the ganache. You definitely don't need the ganache, but it doesn't hurt a thing. Except maybe your waist line.

                  Brownie Ingredients:

                  • 1 1/2 cups cocoa powder
                  • 2 tablespoons teaspoon baking soda
                  • 2/3 cup boiling water
                  • 1 1/4 cups melted vegan butter
                  • 2 2/3 cups agave
                  • tablespoons vinegar
                  • 1 tablespoon pure vanilla extract
                  • 1 1/2 teaspoon sea salt
                  • 3 cups flour
                  • 2 cups vegan chocolate chips (optional)

                  Ganache Ingredients:
                  • 1/2 cup full fat coconut milk
                  • 1 1/2 cups vegan chocolate chips (or chopped chocolate)
                  Preparing the Brownies:
                  1. Preheat the oven to 350 degrees
                  2. Grease 9x13 inch baking pan
                  3. In a stand mixer, mix cocoa powder and baking soda on low speed until combined
                  4. While still on low speed, add water and melted butter. Mix until a paste forms (if needed- help mash dry and wet ingredients with a rubber spatula)
                  5. Once paste is formed- add agave, vinegar, and vanilla extract. Mix until all ingredients are fully incorporated. Turn the mixer off.
                  6. Add flour, sea salt and chocolate chips and turn mixer on low speed. Mix until flour is fully dissolved into batter, but be careful not to over-mix. 
                  7. Spread batter into greased pan and bake for 45-50 minutes. Test with a toothpick-- and when only a few wet crumbs stick to the toothpick, the brownies are done! (Test a few inches from the edge, not the center of the pan) Be careful not to over bake them!!
                  8. Let the brownies cool completely before cutting.
                  Preparing the Ganache:
                  1. Warm the coconut milk in a small saucepan. Bring to a simmer and then remove from heat.
                  2. Add chocolate chips, and let stand for 2 minutes. 
                  3. Mix the chocolate and coconut milk together. Let cool to room temperature. 
                  Assembly!
                  1. Once brownies have cooled completely, cut them into desired size. (They are pretty heavy, so smaller may be better in this case)
                  2. After brownies have been cut, do not separate them yet! 
                  3. Spread room temperature ganache over the top of brownies (it is a lot less of a mess to cut brownies before covering with ganache!)
                  4. I would recommend storing the brownies in a airtight container in the refrigerator. 
                  ENJOY!